How to fix wlanO not found

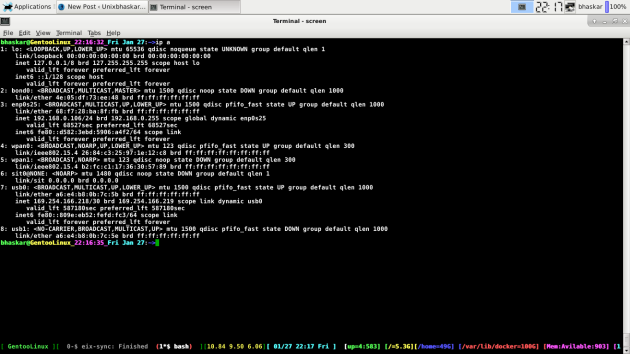
The problem statement is while doing an *ip a* on the terminal and its output doesn’t show the wireless device, like below:

wlan0_not_showing_2017-01-27-22-17-20

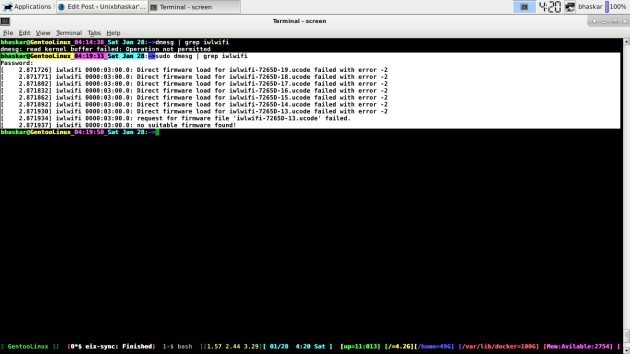
The dmesg says like this below:

iwlwifi_firmware_not_found_2017-01-28-04-20-26

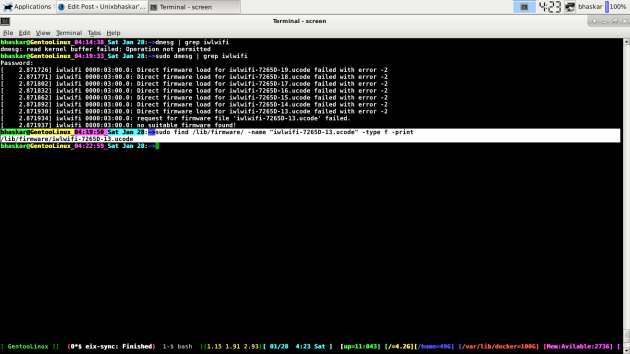
Let me cross check that file is present in the system or not,  just like below:

firmware_file_present_2017-01-28-04-23-41

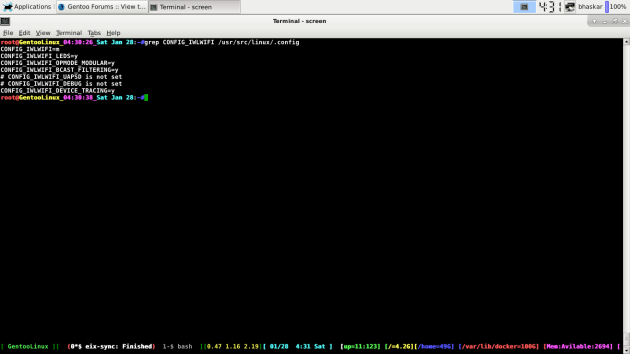
So, it is very much seated there, where it suppose to be  Well, that trigger me trip to visit some kernel config variables, like below:

kernel_var_2017-01-28-04-31-25

It looks fine, then?? well, that warrant few more checks, well I made some trip to *gentoo forum* to know what is missing. And someone in the closed thread mentioned that The variable in question is CONFIG_IWLWIFI which is recommended =m and that necessarily meant I have to recompile the kernel one more time with that variable set to the module in the kernel.

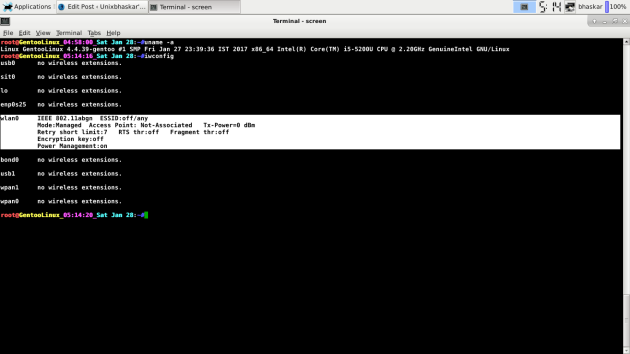
Next, I went ahead and compile the kernel with that mentioned variable as the module. Okay, I have rebooted my machine and here is the outcome,

wlan0_showing_2017-01-28-05-14-35

Cool, but why we have to turn it to a module within the kernel than just straight built into the kernel not showing the device ?? The reason, by the time kernel boot and the firmware file, reside on the filesystem not yet read so it was missing.

Hope this will help.


GNU/Linux container internals aka Cgroups and Namespaces

In this post, I will shed some light on the GNU/Linux container internals.Basically, what is underlying technology driving that. Here we go,without much ado:

What is GNU/Linux Container?

Is an operating system-level virtualization method for running multiple isolated GNU/Linux systems (containers) on a single control host (LXC host). It does not provide a virtual machine, but rather provides a virtual environment that has its own CPU, memory, block I/O, network, etc. space. This is provided by cgroups ( we will give details about it later) features in Linux kernel on LXC host. It is similar to a chroot, but offers much more isolation.
Before I give you the information about LXC , let me make you aware of the two crucial aspect of it ,namely cgroups and namespace.

Cgroups AKA Control Group:

It is a Linux kernel feature to limit, police and account the resource usage of certain processes (actually process groups).

  • Create and manage them on the fly using tools like cgcreate, cgexec, cgclassify etc
  • The “rules engine daemon”, to automatically move certain users/groups/commands to groups (/etc/cgrules.conf and /usr/lib/systemd/system/cgconfig.service)
  • Through other software such as (LXC) virtualization
  • (control groups) subsystem is a Resource Management solution providing a generic process-grouping framework
  • Cgroups provide resource management solution (handling groups)

For Cgroups implementation need a few simple hook into rest of the kernel,namely :

a) For each process :/proc/pid/cgroup

b) System-wide: /proc/cgroup
But we are lucky enough that, newer distribution running systemd comes along with all those tweak by default,so don’t sweat.

A little internals does not harm!! here we go :

First,cgroups use VFS(virtual file systems),all entries created in it ,are not persistent,means deleted on reboot.

Second, all cgroups actions are performed via file systems actions(create/remove directory,reading/writing to the files in it,mounting/mount options).

For example :

cgroup inode_operations for cgroup mkdir/rmdir.

cgroup file_system_type for cgroup mount/unmount.

cgroup file_operations for reading/writing to control files.

Systemd uses control groups only for the process grouping ;not for anything else like allocating resources like block io, bandwidth,etc.

It look something like this :

#subsys_name hierarchy    enabled

cpuset  8    1    1

cpu 3    2    1

cpuacct 3    2    1

blkio   4    2    1

memory  7    2    1

devices 2    41   1

freezer 5    1    1

net_cls 6    1    1

Below are few things you can do with cgroup,provided the library is installed:

Example:

cgcreate -g cpuset:/test

cgset -r cpuset.cpus=1 /test

cgset -r cpuset.mems=0 /test

cgexec -g

I have touched the tip of ice-burg ,if you are really interested to explore more , then you should follow the below mentioned link.

To use the effect of it ,you got to install libcgroup. The best place to know about cgroups is here and here and here  . Please read those mentioned link before to get a thorough understanding of cgroups.

Namespaces:

a)It is light weight process virtualization.

b) Isolation : enable a process or group of process to view the system in different perspective.

c)Much like zones in Solaris.

d)No hypervisor layer(as in OS virtualization like kvm and xen)

There are currently 6 namespaces,those are:

  • mnt(mount points and filesystems)
  • pid(processes)
  • net(network stack)
  • ipc(system v ipc)
  • uts(hostname)
  • user(UIDs)

Namespace first appear in Linux kernel 2.4.19,way back in 2002!!

** Each namespace has a unique inode number.

You need to know which config options are get effected ,while manipulating it(namespace). Here are those :

Kernel config items:

CONFIG_NAMESPACES

CONFIG_UTS_NS

CONFIG_IPC_NS

CONFIG_USER_NS

CONFIG_PID_NS

CONFIG_NET_NS

Each and every option doing the specific duty,as mentioned earlier. And in user space you have two package to play with it,those are :

iproute and util_linux 

Please explore those package in and the offering in detail to work with the above.Plus one has care about below findings:

How to find all existing namespace in GNU/Linux?

If you execute as root,you get the list of attached namespaces of the init process using PID=1.

In order to find other namespaces with attached processes in the system, we use these entries of the PID=1 as a reference. Any process or thread in the system, which has not the same namespace ID as PID=1 is not belonging to the DEFAULT namespace.

Additionally, you find the namespaces created by “ip netns add ” by default in /var/run/netns/ .

Okay, credit has to be given where it’s due……

Rami Rosen was kind enough to provide lots of information about those and most importantly share with public.Thanks Rami!  Here is his paper about it.

Check out this wonderful guide about it at LWN. Equally well written blog about it on opencloudblog and  here .

How docker use namespace,specifically about mount namespace.

Justin Weissig written a wonderful article about cgroups.

A must view place is kernel documentation about cgroups.

Ginny Henningsen and Lenz Grimmer written a magnificent blog at Oracle site.

Hope this will give you heads up.

Cheers!

Converting ext3 to ext4 filesystem

Here is a little tip which might help people to do the required thing to get the job done. As the title of this post said..will outline the procedure for that.

Here we go..


bhaskar@GentooLinux_10:50:09_Thu Mar 28:~> sudo blkid
Password:
/dev/sda1: LABEL="ARCH" UUID="9db5a364-ee86-4c57-8252-bfff8581e4b6" TYPE="ext4"
/dev/sda2: LABEL="Fedora-boot" UUID="ff94a6b0-3eee-4dc9-83e0-cbde449e93d7" SEC_TYPE="ext2" TYPE="ext3"
/dev/sda3: UUID="kiCF1K-xTxV-t2Yu-CrBX-oENB-1kSn-6UY4Va" TYPE="LVM2_member"
/dev/sda5: UUID="X2MDAl-EaD9-s0kY-FbpZ-X6Wo-GowQ-yvTu1z" TYPE="LVM2_member"
/dev/sda6: LABEL="Fedora" UUID="7945ae6e-7061-4153-a5a1-ab9f60f693ae" TYPE="ext4"
/dev/sda7: UUID="61147c93-cf06-4d45-8204-b79b5b5d19a4" TYPE="swap"
/dev/sda8: LABEL="Slackware" UUID="77de30c7-fb6a-42d8-9cc3-7bd29e2cba06" TYPE="ext4"
/dev/sda9: LABEL="Gentoo" UUID="d83b45ce-ce1c-4678-9663-b884bab6f5cb" TYPE="ext4"
/dev/sda10: LABEL="Debian" UUID="1c0feb69-e586-4b2a-b774-176066a12e00" SEC_TYPE="ext2" TYPE="ext3"
/dev/sda11: LABEL="ScientificLinux" UUID="7dedb9fe-8d77-4c93-bdbd-3297281041be" TYPE="ext4"
/dev/sda12: LABEL="openSUSE" UUID="924f28b3-8cda-4d7e-a833-c7687580e113" TYPE="ext4"
/dev/sda13: UUID="1Ke3cG-vv1Y-vgi6-Sszr-r3nz-xbQx-QzFyp1" TYPE="LVM2_member"
/dev/mapper/home-home: UUID="9fa403bf-858d-4ce2-9b5e-03bdeb2e9406" TYPE="ext3"
/dev/mapper/data-lvmdata: UUID="569e992f-3782-4689-8abf-85b59af4ba17" TYPE="ext3"
bhaskar@GentooLinux_11:58:30_Thu Mar 28:~> cat convert_to_ext4
tune2fs -O extents,uninit_bg,dir_index /dev/dev-name

For example convert /dev/sdb1 to ext4, enter:
# cd /; umount /dev/sdb1
# tune2fs -O extents,uninit_bg,dir_index /dev/sdb1
Next run fsck, enter:
# fsck -pf /dev/sdb1
a10skar@GentooLinux_11:58:38_Thu Mar 28:~> sudo tune2fs -O extents,uninit_bg,dir_index /dev/sda10
tune2fs 1.42 (29-Nov-2011)
bhaskar@GentooLinux_11:59:18_Thu Mar 28:~> fsck -pf /dev/sda10
bash: fsck: command not found
bhaskar@GentooLinux_11:59:36_Thu Mar 28:~> whereis fsck
fsck: /sbin/fsck.cramfs /sbin/fsck.minix /sbin/fsck.ext2 /sbin/fsck.ext4dev /sbin/fsck.ext4 /sbin/fsck.ext3 /sbin/fsck /usr/share/man/man8/fsck.8.bz2
bhaskar@GentooLinux_11:59:42_Thu Mar 28:~> sudo /sbin/fsck -pf /dev/sda10
fsck from util-linux 2.21.2
Debian: 261230/1220608 files (1.1% non-contiguous), 1666171/4882432 blockssudo blkid
/dev/sda1: LABEL="ARCH" UUID="9db5a364-ee86-4c57-8252-bfff8581e4b6" TYPE="ext4"
/dev/sda2: LABEL="Fedora-boot" UUID="ff94a6b0-3eee-4dc9-83e0-cbde449e93d7" SEC_TYPE="ext2" TYPE="ext3"
/dev/sda3: UUID="kiCF1K-xTxV-t2Yu-CrBX-oENB-1kSn-6UY4Va" TYPE="LVM2_member"
/dev/sda5: UUID="X2MDAl-EaD9-s0kY-FbpZ-X6Wo-GowQ-yvTu1z" TYPE="LVM2_member"
/dev/sda6: LABEL="Fedora" UUID="7945ae6e-7061-4153-a5a1-ab9f60f693ae" TYPE="ext4"
/dev/sda7: UUID="61147c93-cf06-4d45-8204-b79b5b5d19a4" TYPE="swap"
/dev/sda8: LABEL="Slackware" UUID="77de30c7-fb6a-42d8-9cc3-7bd29e2cba06" TYPE="ext4"
/dev/sda9: LABEL="Gentoo" UUID="d83b45ce-ce1c-4678-9663-b884bab6f5cb" TYPE="ext4"
/dev/sda10: LABEL="Debian" UUID="1c0feb69-e586-4b2a-b774-176066a12e00" TYPE="ext4"
/dev/sda11: LABEL="ScientificLinux" UUID="7dedb9fe-8d77-4c93-bdbd-3297281041be" TYPE="ext4"
/dev/sda12: LABEL="openSUSE" UUID="924f28b3-8cda-4d7e-a833-c7687580e113" TYPE="ext4"
/dev/sda13: UUID="1Ke3cG-vv1Y-vgi6-Sszr-r3nz-xbQx-QzFyp1" TYPE="LVM2_member"
/dev/mapper/home-home: UUID="9fa403bf-858d-4ce2-9b5e-03bdeb2e9406" TYPE="ext3"
/dev/mapper/data-lvmdata: UUID="569e992f-3782-4689-8abf-85b59af4ba17" TYPE="ext3"

In the many partition I have changed the “Debian” partition from ext3 to ext4.Next time you get into that specific drive …please check the file /proc/filesystems …and it should enlist ext4 in it.

Hope this will help.

Cheers!
Bhaskar
Get information about packages through yaourt

In this article I will show you how you can obtain the information about the packages in the system through package manager wrapper.I am sitting on Arch Linux and the default package manager is pacman. But here I am going to demonstrate a wrapper over pacman called “yaourt“.

So,without much ado, here is what it produced when I asked for the system package stats:

bhaskar@bhaskar-laptop_14:22:00_Wed Mar 30:~> sudo yaourt --stats
-------------------------------------------------------------------------------------------------------------------------------------------------------------
| Archlinux (yaourt 0.9.5.3) |
-------------------------------------------------------------------------------------------------------------------------------------------------------------

-------------------------------------------------------------------------------------------------------------------------------------------------------------
Total installed packages: 772
Explicitly installed packages: 279
Packages installed as dependencies to run other packages: 493
Packages out of date: 45
Where 27 packages seems no more used by any package:
beanshell eggdbus hsqldb-java kernel26-headers ladspa libgphoto2 libgsf-gnome libmspack liboil libtracker libvncserver libxfontcache libxxf86misc
lirc-utils loudmouth lucene musicbrainz nickle perl-dbd-mysql perl-term-readkey saxon seed vbetool vigra xcursor-themes xorg-apps xorg-xkb-utils
Hold packages: (2) pacman glibc
Ignored packages: (0)
Ignored groups: (0)

-------------------------------------------------------------------------------------------------------------------------------------------------------------
Number of configured repositories: 7
Packages by repositories (ordered by pacmans priority):
core(159), extra(550), extra(0), community(31), extra(0), archlinuxfr(3), extra(0), others*(29)

*others are packages from local build or AUR Unsupported

-------------------------------------------------------------------------------------------------------------------------------------------------------------

Theorical space used by packages: 3649M
Real space used by packages: 3202M
Space used by pkg downloaded in cache (cachedir): 8.0G
Space used by src downloaded in cache: null

Hope this will help.

Cheers!
Bhaskar
How to overcome shared library saga on open system

First of all this is just an instance I recover …not always the same path or procedure apply..but surely help.But please refrain yourself doing it on the production box..

I do not issue any guarantee that it will work for you.

So one of OS got clobbered and a specific piece of library is the culprit to prohibit lot of services to start and even run. Because that library is somehow attached to those daemons and services.Now I was discovering a nice piece of software and the part of it to run ssh and sftp. When I start experimenting with it throws error that it cannot connect to the server. So my little experience tell that services might not be running on the box.

As I cross checked it and found it was the case. Second step I tried to start the service and stumbled over with this error:


sudo /sbin/service sshd start
Starting sshd: /usr/sbin/sshd: error while loading shared libraries: libgssapi_krb5.so.2: cannot open shared object file: No such file or directory
[FAILED]

Oooops!! I as discover that when system boot it failed many service like this.So few hover here and the within the system checked those ld.con… related stuff and running “ldconfig” showing that library is very much there in the system and rightly linked. Then the last resort plan to reinstall the that fellow( the krb5-libs) . But doing so might break other thing too in the system. Fortunately I was doing it on test bed not in the production box.Then I have to think different ways.So i went on reinstalling that lib like below:


sudo yum install krb5-libs
Loaded plugins: langpacks, presto, refresh-packagekit
Adding en_US to language list
google-chrome | 951 B 00:00
Setting up Install Process
Package krb5-libs-1.8.2-8.fc14.i686 already installed and latest version
Nothing to do
bhaskar@bhaskar-laptop_18:23:39_Mon Mar 07:~/Downloads/wimleers-fileconveyor-207361c/code> sudo yum reinstall krb5-libs
Loaded plugins: langpacks, presto, refresh-packagekit
Adding en_US to language list
Setting up Reinstall Process
Resolving Dependencies
--> Running transaction check
---> Package krb5-libs.i686 0:1.8.2-8.fc14 set to be reinstalled
--> Finished Dependency Resolution

Dependencies Resolved

=============================================================================================================================================================
Package Arch Version Repository Size
=============================================================================================================================================================
Reinstalling:
krb5-libs i686 1.8.2-8.fc14 updates 693 k

Transaction Summary
=============================================================================================================================================================
Reinstall 1 Package(s)

Total download size: 693 k
Installed size: 1.7 M
Is this ok [y/N]: y
Downloading Packages:
Setting up and reading Presto delta metadata
Processing delta metadata
Package(s) data still to download: 693 k
krb5-libs-1.8.2-8.fc14.i686.rpm | 693 kB 00:32
Running rpm_check_debug
Running Transaction Test
Transaction Test Succeeded
Running Transaction
Installing : krb5-libs-1.8.2-8.fc14.i686 1/1

Installed:
krb5-libs.i686 0:1.8.2-8.fc14

Complete!

Now retry the service I want to start and it’s working!!!..


sudo /sbin/service sshd start
Starting sshd: [ OK ]

Another one coming up…..

sudo /sbin/service puppetmaster sta
Starting puppetmaster: [ OK ]

Yes, as I said this not the optimal solution ..but I will take it.

Hope this will help.

Cheers!
Bhaskar
How to fix security loophole in Gentoo

>

Security is an ongoing matter for all the open system. So it’s upto the guy who in charge of it and some company forces it too.In this article I will show you how you can fix the security hole in Gentoo.

Say you come to know that an security vulnarability has found on some particular and that software were loaded in your box.Here is how you can fix those:


bhaskar@bhaskar-laptop_15:03:56_Tue Jan 25:~> sudo glsa-check -f all
fixing 200812-12
fixing 200802-11
fixing 200705-23
fixing 200406-17
fixing 200804-13
fixing 200409-20
fixing 200708-01
fixing 200801-18
fixing 201001-04
fixing 201011-01
fixing 200909-11
fixing 200509-13
fixing 200612-16
fixing 200606-25
fixing 200405-22
fixing 200711-17
fixing 200510-19
fixing 201006-20
fixing 200602-08
fixing 200310-03
fixing 200506-16

….output is omitted for the sake of brevity, Yes,you spotted it right,glsa-check is an utility in Gentoo system to check security.Once it finished running then just run this command with different arguments; like below:


bhaskar@bhaskar-laptop_15:05:34_Tue Jan 25:~> sudo glsa-check -l affected
[A] means this GLSA was already applied,
[U] means the system is not affected and
[N] indicates that the system might be affected.

Now let me tell you that those alphabet in the left side within square bracket come with different colors. The A will be on normal white,the U will be green and the N in red.Important part to check how many N you have .

So,one tiny utility can do wonder,indeed.You can put it into the cron to run it periodically.

Hope this will help.

Cheers!
Bhaskar

The mystery behind LUN(Logical Unit Number)

>After being amazed and bewildered for sometime and listening to people talking so geeky about it ;I decided to unearth few intricacies about it.As we all know few parts of the world where people making simple thing complicated to others which benifit few blunt headed idiots to get cheap credit and save thier arse.

Oh! by the way forgot to mention that(those of you ignore the title)this is all about telling some intricacies about LUN(Logical Unit Number) .So without much ado lets dive into it.

Let me give you a clear cut definition I have come across so far is this “A LUN is a Logical Unit Number. It can be used to refer to an entire physical disk, or a subset of a larger physical disk or disk volume. The physical disk or disk volume could be an entire single disk drive, a partition (subset) of a single disk drive, or disk volume from a RAID controller comprising multiple disk drives aggregated together for larger capacity and redundancy. LUNs represent a logical abstraction or, if you prefer, virtualization layer between the physical disk device/volume and the applications.”

So how can you detect the LUN?

So there are two common ways to detect it,one is through /proc filesystes check and second is create a initrd image with it so time of os boot it can be detected.

Take the first case by scanning the /proc filesystem check; we need to the following to get a sense of it or aware of it:


bhaskar@bhaskar-laptop_06:55:52_Wed Nov 17:~> sudo cat /proc/scsi/scsi
Password:
Attached devices:
Host: scsi0 Channel: 00 Id: 00 Lun: 00
Vendor: ATA Model: ST9160821AS Rev: 3.BH
Type: Direct-Access ANSI SCSI revision: 05
Host: scsi3 Channel: 00 Id: 00 Lun: 00
Vendor: Optiarc Model: DVD RW AD-7560A Rev: DH10
Type: CD-ROM ANSI SCSI revision: 05

As you can see it from the out of that scan of /proc filesystem.Now the next one getting the LUN thing detected when the os boots.

Detect LUNs automatically at system boot

The second method of configuring LUNs for a Linux system with only LUN 0 configured involves setting the parameter for the SCSI mid-layer driver that controls how many LUNs are scanned during a SCSI bus scan. The following procedure works for both 2.4 and 2.6 kernels, but it assumes the SCSI mid-layer driver is compiled as a scsi_mod module that is loaded automatically at system boot time. For Linux 2.4 kernels, to set the maximum number of disk devices under Linux to properly detect all volumes, you need to set the max_scsi_luns option for the SCSI mid-layer driver. For example, if max_scsi_luns is set to 1 this limits SCSI bus scans to only LUN 0. This value should be set to the respective maximum number of disks the kernel can support, for example, 128 or 256. In Linux 2.6 kernels, the same procedure applies, except that the parameter has been renamed from max_scsi_luns to max_luns.

1. Edit the /etc/modules.conf file.
2. Add the following line:
* options scsi_mod max_scsi_luns= (where is the total number of luns to probe.
3. Save the file.
4. Run the mkinitrd command to rebuild the ram-disk associated with the current kernel. You can use the following figures examples of what mkinitrd command to run for your operating system. refers to the ‘uname –r’ output which displays the currently running kernel level, for example:. 2.4.21-292-smp.
For SUSE distributions, use the following command:

cd /boot
mkinitrd –k vmlinuz- -i initrd-

For Red Hat distributions, use the following command:

cd /boot
mkinitrd –v initrd-.img

5. Reboot the host.
6. Verify that the boot files are correctly configured for the newly created initrd image in the /boot/grub/menu.lst file.

The basics behind it somewhat is this LUNs are created as a basic part of the storage provisioning process using software tools that typically accompany the particular storage platform. However, there is not a 1-to-1 ratio between drives and LUNs. Many LUNs can easily be carved out of a single disk drive.

For example, a 500 GB drive can be partitioned into one 200 GB LUN and one 300 GB LUN, which would appear as two unique drives to the host server. Conversely, storage administrators can employ Logical Volume Manager software to combine multiple LUNs into a larger volume. Veritas Volume Manager from Symantec Corp. is one example of this software. In actual practice, disks are first gathered into a RAID group for larger capacity and redundancy (e.g., RAID-50), and then LUNs are carved from that RAID group.

LUNs are often referred to as logical “volumes,” reflecting the traditional use of drive volume letters, such as volume C: or volume F: on your computer. But some experts warn against mixing the two terms, noting that the term “volume” is often used to denote the large volume created when multiple LUNs are combined with volume manager software. In this context, a volume may involve numerous LUNs and can confuse storage allocation.

Once created, LUNs can also be shared between multiple servers. For example, a LUN might be shared between an active and standby server. If the active server fails, the standby server can immediately take over. However, it can be catastrophic for multiple servers to access the same LUN simultaneously without a means of coordinating changed blocks to ensure data integrity. Cooordinating data changes requires clustering software, such as a clustered volume manager, a clustered file system, a clustered application or a network file system using NFS or CIFS.

LUN scaling and performance

LUNs are based on disks, so LUN performance and reliability will vary for the same reasons. For example, a LUN carved from a Fibre Channel 15K rpm disk will perform far better than a LUN of the same size taken from a 7,200 rpm SATA disk. This is also true of LUNs based on RAID arrays where the mirroring of a RAID-0 group may offer significantly different performance than the parity protection of a RAID-5 or RAID-6/dual parity (DP) group. Proper RAID group configuration will have a profound impact on LUN performance.

An organization may utilize hundreds or even thousands of LUNs, so the choice of storage resources has vast implications for a storage administrator. Not only is it necessary to supply an application with adequate capacity (in gigabytes), but the LUN must also be drawn from disk storage with suitable characteristics.

LUN management tools

Since an enterprise array may host more than 10,000 LUNs, software tools are vital for efficient LUN creation, manipulation and reporting. Such management tools are readily available; almost every storage vendor provides some type of management software to accompany products ranging from direct-attached storage (DAS) devices to enterprise arrays.

Administrators typically opt for vendor-specific or heterogeneous tools. A data center with one storage array or a single-vendor shop would do well with the indigenous LUN management tool that accompanied their storage system. Multivendor shops should at least consider heterogeneous tools that allow LUN management across all of the storage platforms.

A LUN management tool should also support the entire storage provisioning process. Features should include mapping to specific array ports and masking specific host bus adapters (HBA), along with comprehensive reporting. The LUN management tool should also be able to reclaim storage that is no longer needed. Although a few LUN management products support autonomous provisioning, some administrators have reservations about such automation.

SAN zoning and masking

LUNs are the basic vehicle for delivering storage, but provisioning SAN storage isn’t just a matter of creating LUNs or volumes; the SAN fabric itself must be configured so that disks and their LUNs are matched to the appropriate servers. Proper configuration helps to manage storage traffic and maintain SAN security by preventing any server from accessing any LUN.

Zoning makes it possible for devices in a Fibre Channel network to see each other. By limiting the visibility of end devices, servers (hosts) can only see and access storage devices that are placed into the same zone. In more practical terms, zoning allows certain servers to see one or more ports on a disk array. Bandwidth, and thus minimum service levels, can be reserved by dedicating certain ports to a zone or isolate incompatible ports from one another.

Zoning is an important element of SAN security and high-availability SAN design. Zoning can typically be broken down into hard and soft zoning. With hard zoning, each device is assigned to a zone, and that assignment can never change. In soft zoning, the device assignments can be changed by the network administrator.

LUN masking adds granularity to this concept. Just because you zone a server and disk together doesn’t mean that the server should be able to see all of the LUNs on that disk. Once the SAN is zoned, LUNs are masked so that each host server can only see specific LUNs.

Suppose that a disk has two LUNs: LUN_A and LUN_B. If we zoned two servers to that disk, both servers would see both LUNs. However, we can use LUN masking to allow one server to see only LUN_A and mask the other server to see only LUN_B. Port-based LUN masking is granular to the storage array port, so any disks on a given port will be accessible to any servers on that port. Server-based LUN masking is a bit more granular; a server will see only the LUNs assigned to it, regardless of the other disks or servers connected.

Adding/Removing a Logical Unit Through rescan-scsi-bus.sh

The sg3_utils package provides the rescan-scsi-bus.sh script, which can automatically update the logical unit configuration of the host as needed (after a device has been added to the system). The rescan-scsi-bus.sh script can also perform an issue_lip on supported devices. For more information about how to use this script, refer to rescan-scsi-bus.sh –help.
To install the sg3_utils package, run yum install sg3_utils.

Known Issues With rescan-scsi-bus.sh

When using the rescan-scsi-bus.sh script, take note of the following known issues:

In order for rescan-scsi-bus.sh to work properly, LUN0 must be the first mapped logical unit. The rescan-scsi-bus.sh can only detect the first mapped logical unit if it is LUN0. The rescan-scsi-bus.sh will not be able to scan any other logical unit unless it detects the first mapped logical unit even if you use the –nooptscan option.

A race condition requires that rescan-scsi-bus.sh be run twice if logical units are mapped for the first time. During the first scan, rescan-scsi-bus.sh only adds LUN0; all other logical units are added in the second scan.

A bug in the rescan-scsi-bus.sh script incorrectly executes the functionality for recognizing a change in logical unit size when the –remove option is used.

The rescan-scsi-bus.sh script does not recognize ISCSI logical unit removals.

Resources:

1) http://publib.boulder.ibm.com/infocenter/dsichelp/ds6000ic/index.jsp?topic=%2Fcom.ibm.storage.smric.help.doc%2Ff2c_linuxlunconfig_2hsaga.html

2) http://www.redhat.com/docs/en-US/Red_Hat_Enterprise_Linux/html/Online_Storage_Reconfiguration_Guide/rescan-scsi-bus.html

Hope this will help.

Cheers!
Bhaskar

Let’s deal with oddity : Remove filename with special char in them

>Let’s face it,everyone face some oddity sooner then later to deal with open system.I have had come across quite a lot over the decade and am going to share few in this article.

Sometime people forget the basic thing and make things complicated. Like when they create a simple file they put arcane character in the name and it will create havoc in later stage.For example if someone create a file with “–” or “#” or some other character in the filename.Say one has a filename like below:


bhaskar@bhaskar-laptop_18:35:12_Fri Nov 05:~> touch -- -hey

Now you cannot list it like below:

bhaskar@bhaskar-laptop_18:38:52_Fri Nov 05:~> ls -l -hey
ls: invalid option -- 'e'
Try `ls --help' for more information.

Or

delete it like below;

bhaskar@bhaskar-laptop_18:39:00_Fri Nov 05:~> rm -f -hey
rm: invalid option -- 'h'
Try `rm ./-hey' to remove the file `-hey'.
Try `rm --help' for more information.

Now this is hindering you to get rid of it or even worse to take backup from the system if that file included in the backup list.So how to get rid of it ..as we all know that file store all the information in inode..so get it..

bhaskar@bhaskar-laptop_18:42:19_Fri Nov 05:~> ls -i | grep hey
655109 -hey

Now you can get rid of that file by inode like below:

bhaskar@bhaskar-laptop_18:50:14_Fri Nov 05:~> find . -inum 655109 -exec rm -i {} \;
rm: remove regular empty file `./-hey'? Y

Hope this will help .

Cheers!
Bhaskar

Exploring /dev/random vs. /dev/urandom and /dev/zero vs. /dev/null

In this article I will take you through the mystries behind those files. All those are very critical and important to most of the open system specifically to GNU/Linux system.So one has to have an idea how it going underneath to deal with them and utilise it proper way.

First I shall explore /dev/random vs. /dev/urandom, so here we go:

One of they key thing come into the mind to generate random rumber during the public-private key pair creation time.There will be many more instances where this files will come into play.So how do go about them?

Linux implements a purely algorithmic random number generator, accessible as /dev/random. Its results are good enough for most purposes, but there are times when true randomness is needed. To that end, the kernel attempts to harvest randomness (called “entropy”) from its environment. The timing between the keystrokes , exhibits some randomness. The same is true of, for example, the timing of disk interrupts. The lower bits of the system time stamp counter can also provide a bit of entropy. The kernel collects this entropy into a special pool of bits, and uses this entropy pool when true random numbers (obtained from /dev/random) are required. The amount of accumulated entropy is also tracked; if there is insufficient entropy in the pool to satisfy a random number request, the requesting process will block until the needed entropy arrives.

When we generate the random number we should do some intensive work to fill the entropy pool.That is do some disk I/O work,move the mouse ,punch some keystroke etc.

With /dev/random:

bhaskar@bhaskar-laptop_07:32:47_Wed Sep 15:~> sudo dd if=/dev/urandom of=/tmp/uran
Password:
654082+0 records in
654081+0 records out
334889472 bytes (335 MB) copied, 82.0738 s, 4.1 M

And now with /dev/urandom:

bhaskar@bhaskar-laptop_09:39:45_Wed Sep 15:~> sudo dd if=/dev/urandom of=/tmp/ran
1377600+0 records in
1377600+0 records out
705331200 bytes (705 MB) copied, 173.111 s, 4.1 MB/s

Both the cases it was a 3 min interval and that time I do lot of disk intensive work.Now few info about those character files:

/dev/random blocks when entropy pool exhausted whereas /dev/urandom draws from entropy pool until depleted and essentially falls back to pseudo-random-number generators.The entropy pool is maintained in the file /var/lib/random-seed between boots and inplemented by the random script service in RHEL system.

Now it’s time to look into /dev/zero and /dev/null,so here we go:

Writing to both the files are equall .both send your output to blackhole. Executing either of the above commands will satisfy your requirements if you just want to “dump” output to “nowhere.” They should both be character (or raw) devices, have identical major device numbers and only differ at the minor device number level. These numbers will differ from OS to OS, but the basic definitions above should hold relatively true.

Reading from /dev/null and /dev/zero: This is where the difference between the two files becomes apparent. The most significant difference is exposed in the “reading” since this action highlights the major way in which the two differ.

/dev/null is, essentially, a black hole. Writes to it (as noted above), basically go down the drain. They go nowhere, stay there and you can’t get them back. When you “read” from /dev/null, the same rule holds true. /dev/null is virtually “nothing,” and all reads from it produce no output whatsoever. For instance, Linux‘s “strace”  shows what happens when /dev/null is read from (e.g. “cat /dev/null“) – below, what you’d see at the command line, followed by a snippet of strace output from the almost-immediate end of the command’s execution:

bhaskar@bhaskar-laptop_09:54:39_Wed Sep 15:~> sudo cat /dev/null
Password:

bhaskar@bhaskar-laptop_11:49:10_Wed Sep 15:~> sudo strace cat /dev/null
Password:
execve(“/bin/cat”, [“cat”, “/dev/null”], [/* 16 vars */]) = 0
brk(0)                                  = 0x8269000
mmap2(NULL, 4096, PROT_READ|PROT_WRITE, MAP_PRIVATE|MAP_ANONYMOUS, -1, 0) = 0xb7816000
access(“/etc/ld.so.preload”, R_OK)      = -1 ENOENT (No such file or directory)
open(“/etc/ld.so.cache”, O_RDONLY)      = 3
fstat64(3, {st_mode=S_IFREG|0644, st_size=117500, …}) = 0
mmap2(NULL, 117500, PROT_READ, MAP_PRIVATE, 3, 0) = 0xb77f9000
close(3)                                = 0
open(“/lib/libc.so.6”, O_RDONLY)        = 3
read(3, “\177ELF\1\1\1\3\3\1\320m\1004″…, 512) = 512
fstat64(3, {st_mode=S_IFREG|0755, st_size=1347988, …}) = 0
mmap2(NULL, 1354184, PROT_READ|PROT_EXEC, MAP_PRIVATE|MAP_DENYWRITE, 3, 0) = 0xb76ae000
mmap2(0xb77f3000, 12288, PROT_READ|PROT_WRITE, MAP_PRIVATE|MAP_FIXED|MAP_DENYWRITE, 3, 0x145) = 0xb77f3000
mmap2(0xb77f6000, 10696, PROT_READ|PROT_WRITE, MAP_PRIVATE|MAP_FIXED|MAP_ANONYMOUS, -1, 0) = 0xb77f6000
close(3)                                = 0
mmap2(NULL, 4096, PROT_READ|PROT_WRITE, MAP_PRIVATE|MAP_ANONYMOUS, -1, 0) = 0xb76ad000
set_thread_area({entry_number:-1 -> 6, base_addr:0xb76ad6c0, limit:1048575, seg_32bit:1, contents:0, read_exec_only:0, limit_in_pages:1, seg_not_present:0, useable:1}) = 0
mprotect(0xb77f3000, 8192, PROT_READ)   = 0
mprotect(0xb7834000, 4096, PROT_READ)   = 0
munmap(0xb77f9000, 117500)              = 0
brk(0)                                  = 0x8269000
brk(0x828a000)                          = 0x828a000
open(“/usr/lib/locale/locale-archive”, O_RDONLY|O_LARGEFILE) = 3
fstat64(3, {st_mode=S_IFREG|0644, st_size=1779408, …}) = 0
mmap2(NULL, 1779408, PROT_READ, MAP_PRIVATE, 3, 0) = 0xb74fa000
close(3)                                = 0
fstat64(1, {st_mode=S_IFCHR|0620, st_rdev=makedev(136, 5), …}) = 0
open(“/dev/null”, O_RDONLY|O_LARGEFILE) = 3
fstat64(3, {st_mode=S_IFCHR|0666, st_rdev=makedev(1, 3), …}) = 0
read(3, “”, 32768)                      = 0
close(3)                                = 0
close(1)                                = 0
close(2)                                = 0
exit_group(0)                           = ?

/dev/zero, on the other hand is not the black hole that it appears to be when “writing to it.” When you “read” from /dev/zero, you get a much different result than when you read from /dev/null. This is most specifically because /dev/zero returns zero’s until the cows come home (or you stop reading from it 😉 and “does not” return an EOF like /dev/null. It actually returns the ASCII null character (0x00) ad infinitum.

bhaskar@bhaskar-laptop_11:54:34_Wed Sep 15:~> sudo strace cat /dev/zero
execve(“/bin/cat”, [“cat”, “/dev/zero”], [/* 16 vars */]) = 0
brk(0)                                  = 0x8f0b000
mmap2(NULL, 4096, PROT_READ|PROT_WRITE, MAP_PRIVATE|MAP_ANONYMOUS, -1, 0) = 0xb782b000
access(“/etc/ld.so.preload”, R_OK)      = -1 ENOENT (No such file or directory)
open(“/etc/ld.so.cache”, O_RDONLY)      = 3
fstat64(3, {st_mode=S_IFREG|0644, st_size=117500, …}) = 0
mmap2(NULL, 117500, PROT_READ, MAP_PRIVATE, 3, 0) = 0xb780e000
close(3)                                = 0
open(“/lib/libc.so.6”, O_RDONLY)        = 3
read(3, “\177ELF\1\1\1\3\3\1\320m\1004″…, 512) = 512
fstat64(3, {st_mode=S_IFREG|0755, st_size=1347988, …}) = 0
mmap2(NULL, 1354184, PROT_READ|PROT_EXEC, MAP_PRIVATE|MAP_DENYWRITE, 3, 0) = 0xb76c3000
mmap2(0xb7808000, 12288, PROT_READ|PROT_WRITE, MAP_PRIVATE|MAP_FIXED|MAP_DENYWRITE, 3, 0x145) = 0xb7808000
mmap2(0xb780b000, 10696, PROT_READ|PROT_WRITE, MAP_PRIVATE|MAP_FIXED|MAP_ANONYMOUS, -1, 0) = 0xb780b000
close(3)                                = 0
mmap2(NULL, 4096, PROT_READ|PROT_WRITE, MAP_PRIVATE|MAP_ANONYMOUS, -1, 0) = 0xb76c2000
set_thread_area({entry_number:-1 -> 6, base_addr:0xb76c26c0, limit:1048575, seg_32bit:1, contents:0, read_exec_only:0, limit_in_pages:1, seg_not_present:0, useable:1}) = 0
mprotect(0xb7808000, 8192, PROT_READ)   = 0
mprotect(0xb7849000, 4096, PROT_READ)   = 0
munmap(0xb780e000, 117500)              = 0
brk(0)                                  = 0x8f0b000
brk(0x8f2c000)                          = 0x8f2c000
open(“/usr/lib/locale/locale-archive”, O_RDONLY|O_LARGEFILE) = 3
fstat64(3, {st_mode=S_IFREG|0644, st_size=1779408, …}) = 0
mmap2(NULL, 1779408, PROT_READ, MAP_PRIVATE, 3, 0) = 0xb750f000
close(3)                                = 0
fstat64(1, {st_mode=S_IFCHR|0620, st_rdev=makedev(136, 5), …}) = 0
open(“/dev/zero”, O_RDONLY|O_LARGEFILE) = 3
fstat64(3, {st_mode=S_IFCHR|0666, st_rdev=makedev(1, 5), …}) = 0
read(3, “”…, 32768) = 32768
write(1, “”…, 32768) = 32768
read(3, “”…, 32768) = 32768
write(1, “”…, 32768) = 32768
read(3, “”…, 32768) = 32768
write(1, “”…, 32768) = 32768
read(3, “”…, 32768) = 32768
write(1, “”…, 32768) = 32768
read(3, “”…, 32768) = 32768

…output snipped.

With /dev/null you can create a zero byte file like this :

bhaskar@bhaskar-laptop_11:58:18_Wed Sep 15:~> sudo cat /dev/null > nullfile

bhaskar@bhaskar-laptop_11:59:28_Wed Sep 15:~> ls -al nullfile
-rw-r–r– 1 bhaskar users 0 Sep 15 11:59 nullfile

Besically people use /dev/zero to fill out disk space .Suppose you want to create a file system on a specific partion and want to erase out everything it has presently then simply you can pass that drive to /dev/zero,so it will be filled with zeros.Later you can make the filesystem on it.Like below:

bhaskar@bhaskar-laptop_11:59:31_Wed Sep 15:~> sudo dd if=/dev/zero of=/sys

So the partition /sys become zero filled and raw.If you wish you can make a filesystem on it to hold data.Please don’t try this on a important partitions in the box.

Now I have enlisted below some url for your understanding and this article is influenced by those.

Resources:

a) http://lwn.net/Articles/182874/

b) http://lwn.net/Articles/185260/

c) http://linuxshellaccount.blogspot.com/2009/04/devnull-and-devzero-on-linux-and-unix.html

d) http://linuxshellaccount.blogspot.com/2007/12/using-your-shell-to-generate-randomness.html

Hope this will help.

Cheers!

Bhaskar

LDAP: The tool to manage enterprise infrastructure

>I am provoked or compelled or whatever you say to write this article about this topic and the article that spurs the interest is here and many more on the internet by some brilliant guys and that’s reminds me of dealing with LDAP with one of my job assignment.Without doubt I must say it is a complex topic to deal with( at least my bend of mind says so.. YMMV).But having said that it is an absolute must for any administrator handling large network infrastructure in the corporation should be very well aware of this protocol as well the usability of it.

I do not issue any guarantee that this will work for you.

I am assuming that readers are aware of this protocol, if not then please look in OpenLDAP Website to get an idea of it.OpenLDAP is an open source suite of software that includes the LDAP server daemon (slapd), a replication daemon (slurpd) and a small collection of command line client tools, like ldapsearch and ldapadd, among others. In this article, we’ll set up and populate a small but functional LDAP server using the slapd daemon, and start to make use of it with a Linux client.

Definition and Components

LDAP stands for Lightweight Directory Access Protocol, which is to say that, by definition, LDAP is a protocol, and nothing else. However, the protocol exists to perform operations on data, and is really pretty useless without it. This brings up the components that make up an LDAP deployment: client software used to send LDAP requests, the server daemon that handles incoming LDAP requests, and the back-end data store. I will refer to the last two collectively as a “directory service.”

Back-end Data Storage

Of these components, the back-end data storage mechanism is the least relevant to you unless you’re administering a production LDAP deployment. Developers writing code that accesses an LDAP server and end users who access a directory service via some client utility should be happy to let the protocol do the job of getting data to them without knowing anything about the back end. Adding, removing, updating, deleting, and fetching data from a directory service occurs through the LDAP protocol.

Now there are few variant of the LDAP thing like :

a)OpenLDAP

b) FDS(Fedora Directory Server)

c) Novell’s eDirectory

d)Sun Java System Directory or formarly iPlanet

So we will sticks with OpenLDAP in this article to investigate with.

What Is LDAP Used For?

An LDAP directory service stores information for use by systems as well as end users (and their various applications). Probably the most common use of LDAP is for replacing either flat-file authentication (think /etc/passwd) or legacy networked authentication (think NIS). The benefit of any networked authentication mechanism over a flat file system is clearly that it lifts the burden of having to keep files on all of your systems in sync. The benefit of LDAP over, say, NIS is (among other things) a finer-grained control over the data and how it is accessed (and by whom). You can also make encrypted connections to LDAP servers using TLS or SSL, and you never have to muck with flat file “maps” or complicated Makefiles to change the data.

Because LDAP is a transaction-based system, operations that complete successfully are immediately “live.” Modern Unix-based systems (including Linux, BSD, and OS X) can rely on LDAP to get just about any information they could store in flat files or NIS, including hosts, automounter configuration, users, groups, and more. Add to that the ability to have Samba, Apache, PAM, tcpwrappers, Sendmail, and other applications talk to LDAP for authentication, aliases, and other tidbits of useful information, and you have the beginnings of a very well-integrated, easily maintained, authoritative data source for your entire infrastructure.

LDAP is also popular for use as a “white pages” directory for a department or corporation. For example, most email applications, from Mutt and Pine to Outlook, Evolution, and KMail all know how to talk to an LDAP server. This makes it very easy to, for example, tell KMail to autocomplete addresses as you type using an LDAP directory as its addressbook source instead of (or in addition to) local files.To add to the list Thunderbird too will support that protocol.

A Closer Look at LDAP Data

It’s extremely important when learning about LDAP and how it deals with data to separate the structure (or topology) of the data from the definitions of the objects themselves.

Simply, the structure of LDAP data is a hierarchical collection of objects. Objects can represent anything from people to printers and take their places within the hierarchy using whatever logic you like.

Objects?

Yes, objects. Each object has a list of attributes associated with it that describe that particular object. When you add or delete an object, make a request for an object, or change the value of an object’s attribute, you do so solely using the LDAP protocol. In short, LDAP exists to manipulate or fetch data about objects.

Hierarchical?

The layout of the data in an LDAP directory is the Directory Information Tree (DIT). You can customize it to the needs of your organization, but it’s still a hierarchical tree structure. This tree is not dissimilar to a typical filesystem; there’s a “top” or “root” directory, under which are high-level objects (directories in a filesystem). Those help you to categorize the lower level objects that you’re really interested in (in a filesystem, these are the files themselves).

Suppose you want to store information about people using a hierarchical collection of objects. Viewing things as a filesystem, you could create a /People directory, and under that, create a file–/People/whatEverYouWant. That file contains attribute name and value pairs to describe “steve.” One attribute might be “firstname,” with a value of “Dan.” Save the file, and create a new one for each person. Eventually, you have a filesystem that looks something like:

/people
Steve
Dan
Bhaskar

We might create it like department wise like this:

/people
/Engineering
Bhaskar
Dan
Jones
/Finance
Marry
Garth

LDAP data are represented in the LDIF(LDAP Data Interchange Format).

What Are Objectclasses?

Objectclasses are prototypes for entries that will actually exist in your directory server. The objectclass definition (which uses ASN.1 syntax) specifies which attributes may or must be used by LDAP entries declared as instances of a particular objectclass.

Get it? Let me explain it backward, in the way that most people get into LDAP: you want to store information about people. The most common attributes associated with people are:

* First name
* Last name
* Email address
* Phone numbers
* Room numbers

These attributes are great for setting up an office whitepages server that users can refer to for information about people in their office. The key now is finding out which objectclass definitions either require or allow for the use of these attributes. When I started with LDAP, I researched this by perusing the actual schema files that come with most (if not all) directory servers. These files are human-readable.

Object Class Definitions

Here’s the definition of the inetOrgPerson objectclass, which is a good place to start:

objectclass ( 2.16.840.1.113730.3.2.2
NAME ‘inetOrgPerson’
DESC ‘RFC2798: Internet Organizational Person’
SUP organizationalPerson
STRUCTURAL
MAY (
audio $ businessCategory $ carLicense $ departmentNumber $
displayName $ employeeNumber $ employeeType $ givenName $
homePhone $ homePostalAddress $ initials $ jpegPhoto $
labeledURI $ mail $ manager $ mobile $ o $ pager $
photo $ roomNumber $ secretary $ uid $ userCertificate $
x500uniqueIdentifier $ preferredLanguage $
userSMIMECertificate $ userPKCS12 )

The first line states that what follows is an objectclass definition, as opposed to an attributetype definition. The long number is the ASN.1 number assigned to the objectclass. If you create your own objectclasses, this number is significant; it’s where you use your organization’s IANA Enterprise Number to identify any objectclasses that you create.

The NAME line should be self explanatory. It is the name that will appear in your users’ entries to state that the user is of type inetOrgPerson. This line gives you license to use any of the attributes in the objectclass definition to describe the user.

The DESC line is usually a useful description that can help you use this object in a way appropriate to the intent of the definer. You don’t want to use objectclasses in a completely unorthodox way, because when you reach out to others for help, they’ll find themselves asking you more questions than you ask them, which is often a sign that you’ve gone off in the wrong direction.

The SUP line is critical, and the theory is tough to describe without getting pretty verbose. SUP is short for SUPERIOR, and it names another objectclass from which this objectclass inherits. In this case, the superior or parent objectclass is organizationalPerson. The organizationalPerson class inherits from the person objectclass, which inherits from an objectclass called top. If an objectclass has no other superiors, it is always a child of the top objectclass.

It’s an inheritance chain. You need to understand it, because some LDAP servers strictly enforce it, and if you violate it in the creation of your entries, the directory server will unceremoniously spit them back at you.

The MAY line is actually a block. That block (between parentheses) contains a list, delimited with the $ symbol, of all of the attributes that MAY be used to describe an object declared of the type inetOrgPerson.

OK enough internals..lets go ahead and install and deploy the thing.For more curious reader I will provide you the link from where this article is influenced in resource section in the end.

Installing OpenLDAP:

You can download OpenLDAP from the OpenLDAP website. While it is certainly possible to obtain precompiled binary distributions of OpenLDAP in RPM, deb, and other package formats, these tend to be somewhat older releases. There are many useful customizations you can make during an OpenLDAP compile, and I’ve never had much trouble compiling OpenLDAP from source, so this is the method I’m advocating.

This is not to say that there are absolutely no dependencies to satisfy. There are two major dependencies, both of which are very easy to handle:

Berkeley DB

The OpenLDAP team strongly recommends using Sleepycat Software’s Berkeley DB as the data storage mechanism for an OpenLDAP deployment. As we mentioned in Part One of the series, LDAP is not a database, but a protocol for accessing and managing data. But the data has to live somewhere, and Berkeley DB is easy to deal with, even for newbie admins. If you’re among those who have nightmares about databases, take heart in knowing that OpenLDAP does a superb job at hiding the fact that you’re even dealing with one. Download the Berkeley DB source from the user-friendly Sleepycat download page. For my test build, I used Berkeley DB 4.1.25 without strong encryption support.

Building Berkeley DB couldn’t be easier. Unpack the tarball, cd to the build_unix directory, and type ../dist/configure, followed by make and make install (the last as root). This will create a directory called /usr/local/BerkeleyDB.4.1, which contains all of the pertinent parts we need for our OpenLDAP installation.

OpenSSL for LDAPS

If you’re using Redhat, Fedora,Gentoo,Arch,Debian or any number of other recent distributions, OpenSSL is probably already installed. If it isn’t, and you wish to enable secure connections to your LDAP server, you need to install it. Luckily, this is a breeze. Grab a source tarball from the OpenSSL Download Page. Untar it, cd to the resulting directory, and run the standard configure and make commands. I also recommend that you run make test, and then (as root, of course) make install. This puts everything you need in the /usr/local/ssl directory by default.

Anyway I have created a user and group which will be able to operate the ldap thing going.Here is that:

bhaskar@bhaskar-laptop_14:51:17_Mon Sep 13:~> id ldap
uid=439(ldap) gid=439(ldap) groups=439(ldap)

Now we need to investigate the slapd.conf file,this is the file which drive ldap.So here we go:

Here’s a quick and dirty slapd.conf that gets the daemon up and running and allows an administrative user to manipulate data:

include /etc/openldap/schema/core.schema
include /etc/openldap/schema/cosine.schema
include /etc/openldap/schema/inetorgperson.schema
include /etc/openldap/schema/nis.schema

Schema files define objects and attributes. When the slapd daemon starts, it includes whichever schema files we tell it to here, and that determines the types of objects and attributes supported by that slapd daemon. So, for example, if we did not include the nis.schema file, we would not be able to add typical Unix accounts using only the other schema files we’ve included. Schema files are human-readable, and you could even create your own schema files if you needed some wacky object-types that aren’t already defined.

allow bind_v2
pidfile /var/run/slapd.pid

In newer versions of OpenLDAP, only LDAPv3 binds are allowed by default, which has caused many a mailing list crisis, since there are applications that don’t support making a version 3 bind to a directory server. In the event we come across any in our travels, we’ve allowed LDAPv2 binds for our proof-of-concept, as you can see here:

database bdb
suffix “dc=bhaskar-laptop,dc=localdomain”
rootdn “cn=Manager,dc=bhaskar-laptop,dc=localdomain”
rootpw secret ————> which is generated by slappasswd previously,just cut and paste
directory /var/lib/ldap

Our database backend is the Berkeley database, which OpenLDAP knows as “bdb.” The slapd.conf man page can tell you other possible values for the database directive. Our suffix uses what’s known as the “domain component” model. This model just takes the parts of a domain and references each part of the domain name as a separate domain component (dc). We’ll talk more about this in a future article.

The rootdn and rootpw values define the administrative username and password for performing on the directory or its data operations that require administrative priveleges. The username is defined using a common name (cn), and the object entry for that user is stored directly under our top-level entry — hence the trailing domain components. The password is generated using the slappasswd command, which simply prompts you for a password and generates output which can be cut and pasted into the slapd.conf file, as I’ve done here.

directory tells the slapd daemon where to store the data files for this particular database definition. There can be several database sections in a slapd.conf file. Here, we’re telling slapd to use its home directory as its data storage directory, which is why the ldap user must be able to write there.

index objectClass eq,pres
index ou,cn,mail,surname,givenname eq,pres,sub
index uidNumber,gidNumber,loginShell eq,pres
index uid,memberUid eq,pres,sub

Defining indexes at this early stage won’t make a great amount of difference. However, as the directory grows and more demands are placed upon it, indexes can mean the difference between users who don’t notice that things that used to be handle by, say, NIS are now handled by something else, and a completely unusable directory server.

Now all boil down to starting the ldap daemon that slapd like below:

/etc/init.d/slapd start——————> Every others else

or

/etc/rc.d/slapd start ————> Gentoo ,Arch and variant

or

service slapd start ————> Fedora and Redhat variant

Still it depend on the OS you sit on..but the intention would be same..

Resources:

a)LDAP

b)LDAP-data

c)OpenLDAP Install

d)OpenLDAP Install -II

e)OpenLdap Administration

Hope this will help.

Cheers!
Bhaskar